Real life Gears of War Lancer

[SOC] posted this crazy real life lancer on the AR15.com forums. You are seeing it right, that is a chainsaw bayonet attached to his assault rifle. We thought these were pretty cool, but this thing actually works. It can be seen on an AR15, pictured above, as well as a giant shotgun. We think the shotgun one would be better fitting for zombie hordes. Barney Fife seems strangely fitting for this picture. check out a video of it in action after the break.
That’s not the most graceful or efficient method of opening a door, but it gets the job done.

Gears embedded in business cards
In [Bre Pettis'] latest “things” video, he talks with [Adam Mayer] about his geared business cards. [Adam] has designed several versions of these cards that have functional gear systems in them. There appears to be a simple two gear one and a more complicated planetary gear set up. The designs have been uploaded to Thingiverse, so you can download and build your own.

Bus Pirate firmware update (v.0c), JTAG and more
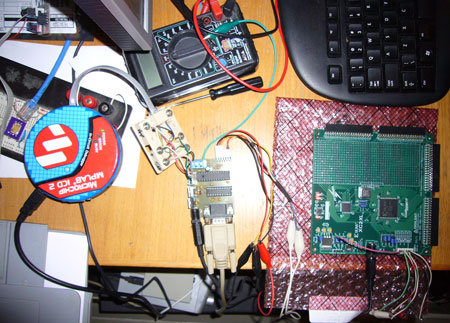
Download: buspirate.v0c.zip
A few weeks ago we wrote about our Bus Pirate universal serial interface tool. We used the recent holiday to add some new features, like a JTAG programmer, macros, frequency measurement, and more. A major code reorganization makes everything easier to read and update.
Check out the a demonstration of the new features below. We’re compiling a roadmap and wish list, so share your ideas in the comments. You can also see how we used the Bus Pirate to read a smart card and test-drive an I2C crystal oscillator.
New protocols
I2C>m <–setup mode
1. HiZ <– high impedance pins (safe mode)
2. 1-WIRE <– not ready for this release
3. UART
4. I2C
5. SPI
6. JTAG <– interface and programmer
7. RAW2WIRE
8. RAW3WIRE
MODE>1
900 MODE SET
HiZ>
This firmware release lists three new protocols.
Hi-Z makes all pins high impedance/input, a safe state that won’t damage an attached circuit. To be safe, the Bus Pirate now starts in this mode.
1-Wire is listed, but we couldn’t include it in this release because we still don’t have any parts to test with our library. This is just a placeholder for now, but it will be added as soon as we get a 1-Wire part to test.
We wrote a simplified JTAG interface that includes a XSVF player for programming JTAG device chains.
**We included a hardware I2C library, but according to the device errata there’s a bug in the 24FJ64GA002 rev3 I2C module. This will work with a different chip (e.g. a 28pin dsPIC33).
Connection table
| PIN | 1-Wire | I2C* | SPI** | RS232 | JTAG |
| B9 | SDA | SDA | MOSI | - | TDI |
| B8 | - | SCL | CLK | - | TCK |
| B7 | - | - | MISO | RX | TDO |
| B6 | - | - | CS | TX | TMS |
| B5 | AUX | AUX | AUX | AUX | AUX |
| Ground | GND | GND | GND | GND | GND |
*also raw 2 wire. **also raw 3 wire.
The new modes connect to the Bus Pirate as outlined in the table.
New features and settings
Frequency measurement
HiZ>F <– do a frequency count
9xx FREQ COUNT ON AUX: 22199552Hz (22MHz)
HiZ>
As seen in the DS1077 demonstration, we added a frequency counter to the Bus Pirate’s AUX pin. ‘F’ measures frequency, maximum of about 50MHz.
Assign axillary control
HiZ>c <– menu c
AUX PIN
1. AUX (DEFAULT)
2. CS/TMS
MODE>1 <– set AUX control mode
9xx AUX: DEFAULT SETTING (AUX PIN)
HiZ>
Sometimes we need to control the chip select (CS) /JTAG state machine (TMS) pins manually. ‘c’ toggles the pin control between the axillary pin and the chip select pin.
Set terminal speed
HiZ>b <– menu b
Set serial port speed: (bps)
1. 300
…
9. 115200
SPEED>9 <– set speed
Adjust your terminal and press space to continue
HiZ>
‘b’ adjusts the PC-side serial port speed.
Macros
A new syntax addition, ‘(#)’, triggers protocol dependent macros.
JTAG>(0) <–macro 0
0.Macro menu
1.Reset chain
2.Probe chain
3.XSVF player
JTAG>
In any mode, use the macro (0) to display a menu of available macros.
I2C address search
I2C>(1) <–scan I2C addresses macro
xxx Searching 7bit I2C address space.
Found devices at:
0xB0 0xB1 <–DS1077 responds to write and read address
I2C>
The I2C library includes a macro to automatically search the I2C address range for devices. Helpful when you work with an unknown chip.
Raw2wire smart card ISO 7813-3 ATR
RAW2WIRE>(1)<–ATR and decode macro
ISO 7813-3 ATR
950 AUX LOW
951 AUX HIGH
4xx RAW2WIRE 0×01 CLOCK TICKS
950 AUX LOW
ISO 7813-3 reply: 0xA2 0×13 0×10 0×91<–ATR bytes
Protocol: 2 wire <–decoded ATR data
Read type: to end<–
Data units: 256 <–
Data unit length: 8 bits <–
RAW2WIRE>
Macro 1 resets and identifies a smart card. For more about the ISO7813-3 ATR, see how we used the Bus Pirate to read a smart card.
JTAG
JTAG is a debugging and programming interface for all kinds of electronics. The raw hardware interface can be accessed with the Bus Pirate’s raw 3 wire library, but we added a few features to make it much easier.
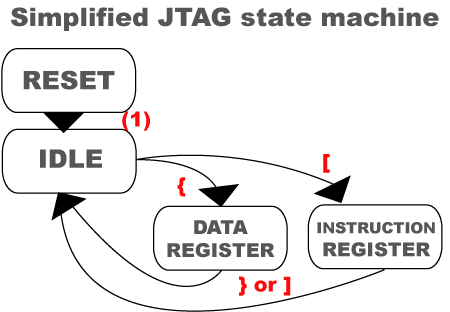
JTAG has different modes where data entry does different things. Modes are navigated with the JTAG TMS signal; there are a bunch of JTAG modes, called states.The Bus Pirate’s JTAG library is just the raw 3 wire library, enhanced to help with JTAG state changes.
We only implemented the JTAG states we need to get data in and out of a JTAG device chain: reset, idle, data register, and instruction register. Macro (1) issues a JTAG chain reset, and initializes the chain to the idle state. { puts the JTAG chain in data register mode. [ puts the chain in instruction register mode. ] or } return the chain to the idle state. The Bus Pirate has an internal state machine tracker that is smart enough to manage the chain without explicitly returning the chain to idle; in other words, you don’t have to close your tags. The state machine tracker reports every state change to help debug problems.
JTAG>[0xfe {rrrr} <-- same as [0xfe]{rrrr}
xxx JTAGSM: ALREADY IDLE
xxx JTAGSM: IDLE->Instruction Register (DELAYED ONE BIT FOR TMS)
610 JTAG READY TO WRITE IR <– JTAG chain instruction register
620 JTAG WRITE: 0xFE <– request ID
xxx JTAGSM: (WROTE DELAYED BIT) IR->IDLE <–back to IDLE
xxx JTAGSM: IDLE->Data Register <–IDLE to data register
611 JTAG READY TO READ/WRITE DR
630 JTAG READ: 0×93 <–device ID
630 JTAG READ: 0×40
630 JTAG READ: 0×60
630 JTAG READ: 0×59
xxx JTAGSM: DR->IDLE <–back to idle
640 JTAG IDLE
JTAG>
Here is a short interaction with a Xilinx XC9572 CPLD. We go to the instruction register ( [ ), and send the device ID request command (0xfe). Then, we go the the data register( { ), read four bytes (rrrr, or r:4 shorthand), and return to idle ( } ).
What are delayed bit writes?
JTAG requires that the last data bit written to the instruction register be entered at the same time as the state change. Since the Bus Pirate has no way of predicting when we'll actually change states, it delays the last bit of each byte write until one of three things happens:
- Exit the instruction register with a }, ], or { command
- Write another byte value
- A read command
Pending bits are not cleared by bitwise operations (like ! or ^). Do these before writing your last byte, or change the code. We haven’t implemented pending writes to the data register, but it’s probably needed. You might need to implement this if you’re writing the data register, rather just reading, like we did.
JTAG Macros
JTAG>(1) <–macro 1
xxx JTAGSM: RESET
xxx JTAGSM: RESET->IDLE
JTAG>
JTAG macro (1) resets the JTAG chain and then advances it to the idle state.
JTAG>(2) <–macro 2
xxx JTAG INIT CHAIN
xxx JTAGSM: RESET
xxx JTAGSM: RESET->IDLE
xxx JTAGSM: IDLE->Instruction Register (DELAYED ONE BIT FOR TMS)
xxx JTAGSM: IR->IDLE
xxx JTAGSM: IDLE->Data Register
xxx JTAGSM: DR->IDLE
xxx JTAGSM: RESET
xxx JTAGSM: RESET->IDLE
xxx JTAGSM: IDLE->Data Register
xxx JTAG CHAIN REPORT: <–start of report
0×01 DEVICE(S)
#0×01 : 0×93 0×40 0×60 0×59 <–device IDs
xxx JTAGSM: DR->IDLE
JTAG>
Macro (2) resets the chain, counts the devices, and reports all the device IDs.
JTAG>(3) <–macro 3
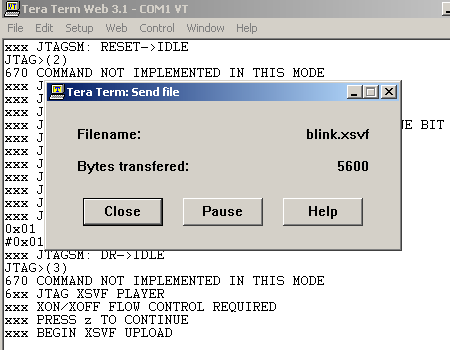
6xx JTAG XSVF PLAYER
xxx XON/XOFF FLOW CONTROL REQUIRED <–required!
xxx PRESS z TO CONTINUE <– press z
xxx BEGIN XSVF UPLOAD <– upload the file
6×0 XSVF OK <– result or error
YOUR PC DRIBBLED MAX 0×05 BYTES AFTER XOFF (THAT’S OK)
6xx PRESS z 5 TIMES TO CONTINUE <– continue
JTAG>
Macro 3 is an XSVF player/programmer using code from Xilinx. XSVF is byte format SVF, as described by Xilinx (pdf). XSVF files can be compiled for any chain with the correct generic JTAG definition files, even non-Xilinx devices. We successfully used the binary transfer features in Hercules and Tera Term to send XSVF files to the programmer.
JTAG sometimes pauses longer than it takes the PC to transfer a byte of data, so we implemented XON/XOFF software flow control for the XSVF player. Your terminal must be in XON/XOFF flow control mode before you upload the XSVF file, or the programmer will fail. Even with software flow control, a modern PC has already send several bytes through the layers of operating system before it receives the flow control signals. We deal with this by catching these bytes before moving on, this is reported as the maximum number of bytes “dribbled”.
If there’s an error in the upload, the PC will probably continue to spit bytes at the Bus Pirate. To keep error messages visible, and prevent garbage in the terminal, the XSVF player waits for five lower case z’s before it returns to the prompt. We chose this sequence because it will never occur in an XSVF file.
*Note that the XSVF player does not respect the JTAG Hi-Z pin setting. Went it does, it fails. Be careful mixing voltages without a buffer.
Better code structure
The biggest difference between the version 0b and 0c firmware is a massive improvement in code structure. The Bus Pirate existed in many incarnations before we packaged it for the initial article. v.0c harmonizes the code libraries and makes it easier to add new protocols.
How to add a custom protocol
The Bus Pirate code handles the user interface, and passes two variables to the active protocol library. The first variable is a command, such as CMD_READ, CMD_READBULK, or CMD_WRITE. The entire command set is defined in base.h. The second variable is an optional value. A simple CMD_READ command passes no value, a bulk read command passes the number of bytes to read, a write command passes the value to write to the bus, etc. At minimum, a custom protocol needs a function to receive these variables and translate them to bus actions.
We used three different techniques to link commands to bus actions. Simple code can go directly in a giant switch statement, like SPI.c. External libraries use an single linking function, like I2C.c, and m_i2c_1.c. More complicated protocols use the switch statement to call functions included in the library (raw2wire.c, raw3wire.c, jtag.c UART.c). Helpful functions for terminal IO are included in base.h/c.
Due to massive code improvements, it’s now only mildly confusing to register a new protocol with the Bus Pirate:
base.h - Create a definition for the protocol. The last entry is currently “#define RAW3WIRE 7″, so the next entry could be “#define MYCUSTOMWIRE 8″.
busPirate.c - Include a header file with that gives access to the processing function. Add a menu entry in the char* mode[] = variable list. The menu entry must be in the same position on the list as the number assigned in the base.h define. If MYCUSTOMWIRE is number 8, it must be the eight entry in the mode variable. Finally, add an additional switch to the bpProcess() function that calls the custom library processing routine when the mode is set to “MYCUSTOMWIRE”.
Taking it further: a Hack a Day wish list
We compiled the feedback we’ve gotten into three wish lists: protocols, features, and macros.
Protocols
- 1-Wire, with enumeration (*ready as soon as we have parts to test it)
- OBD-II (thanks [Shadyman])
- CAN
- MIDI (Wikipedia)
- DMX512-A
- IRDA, RC5x, etc.
Some protocols will require an external transceiver.
Features
- Pulse-width modulator, frequency generator
- “Wait until interrupt” command
- Convert frequency measurement to input capture peripheral
- Allow frequency measurement on any pin
- Show a report of the current configuration settings and pin states.
- Integer repeat values for bulk read, clock ticks, delays, etc.
- A CRC generator
Macros
- Transparent UART bridge
- SD card initialization, meta data extract, and dump
- EEPROM program/dump (I2C/SPI)
- Nokia 6100 LCD initialization, control
- NMEA GPS data decoder
Do you have anything to add to the list?
Firmware download: buspirate.v0c.zip

Nintendo 64 crammed into a NES
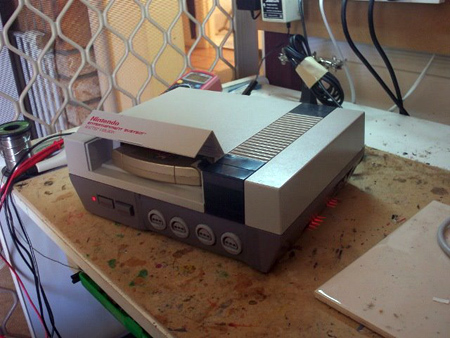
[Matthew] sent us this Nintendo 64 stuffed into an NES. He did a great job really, everything looks nice and tidy. the presentation is decent with only the game ports visible on the front to tell you its not stock. The accent lighting on the side vents is not overpowering. Overall this was a really well done mod. Just like the Nintendo 64 in a Wii mod, this only plays Nintendo 64 games. OK guys, lets get some mods going that don’t involve cramming one Nintendo product into another Nintendo product.

Using VFDs as amplifiers
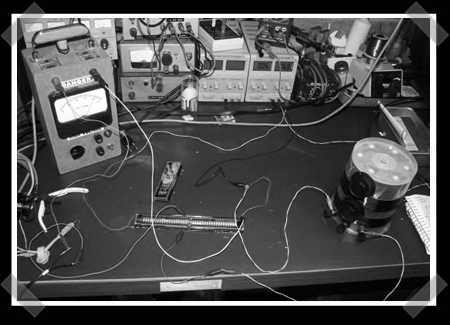
[HP Friedrichs] sent us this cool writeup on how to use scrapped Vacuum Fluorescent Display tubes as amplifiers. For those unfamiliar, a VFD is a display device common to electronics. Many have been replaced by LCD, but you can still find them in modern products. [Friedrichs] points out that his 2008 ford has a VFD for the multimedia display.
Since these units are basically tubes, he figured that you should be able to use them as a tube amp. After some testing, he found it to be quite adequate. The project includes tons of background information on how tubes work, how VFDs work and how to utilize it for amplification. In the picture above, you can see him using one (middle) to amplify a home made radio (right).

Hackit: Netbook haters?

Gadget blogs have been a fluster the last day about TechCrunch stating that netbooks “just aren’t good enough“. Writing a response post hasn’t proven very hard given the number of factual errors in the original. Boing Boing Gadgets points out that the low-end of the spectrum that TC post seems to cover are almost impossible to purchase because they’re so outdated. Liliputing rightly states that comparing the browsing experience to the iPhone isn’t worthwhile since it’s entirely a software problem. Laptop goes so far as to recommend the HP Mini 1000 and Samsung NC10 specifically for their keyboard. TechCrunch isn’t alone in their opinion; this week Intel stated that using the ultra portable devices was “fine for an hour“. TechCrunch is designing a web tablet right now using the collect wisdom of blog commenters. Looks like they’re just reboxing a netbook for the prototype.
We cover the netbook market for different reasons than most: Their low low price makes people much more willing to hack on the device. For the price of a smartphone, you’re getting a fully capable laptop. The low performance doesn’t matter as much since we’re running different flavors of Linux that are much lighter than Windows. People running OSX86 are doing it to address a market that Apple doesn’t.
What’s your experience with netbooks? Do you have one that you adore or are you annoyed by their shortcomings? Models we’ve covered in the past include the Acer Aspire One, Asus Eee PC, Dell Mini 9, and MSI Wind.
[Photo: Onken Bio-pot]

MIDI drums for Guitar Hero and Rock Band
Embedded above is [egyokeo]’s solution for using MIDI drums with Guitar Hero. He’s playing a DrumKAT MIDI kit. It connects to a PC running his MIDI Hero software, which handles timing and multinote combinations. The PC uses a USB ToolStick microcontroller to send commands to the console using an FPS adapter or soldered into the instrument. It’s a fairly good solution if you’re building a generic controller and need to modify the signaling.
When Rock Band was first released, modders sought to adapt their MIDI drum kits for use with the game. The easiest solution they found was Highly Liquid’s MSA-P. It’s a photorelay based MIDI decoder. You need to solder directly to the brain in the Rock Band drums. If you’re planning on modding any instrument, check the compatibility matrix first. Hopefully you’ll end up with something that can be used across multiple games.
[via Gizmodo]

You received this email because you are subscribed to the real_time feed for http://hackaday.com/feed/. To change your subscription settings, please log into RSSFWD.

