Steam powered spud gun
[robbtoberfest] put together this cool looking steam powered spud pistol. Made from household materials, like a lighter and some copper pipe, this spud gun builds pressure in its little bitty boiler to expel the projectiles. It seems as though he’s using a cork to supply a seal, so why bother with potatos? At roughly 2 minutes between shots, its not the quickest, but it sure is cool. Good job [robbtoberfest].

Light Therapy

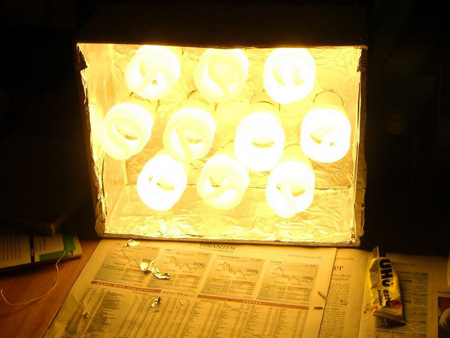
[Boris] wanted to help ease his sister’s seasonal affective disorder. The most common way to do it is with fairly expensive light boxes. [Boris] built one of his own instead. Now his sister can blast her sadness away with over 10,000 lumens of CFL happiness. This is pretty much the same method one would use to create a ring light for photography.

Parts: Precision humidity and temperature sensor (SHT1x/7x)

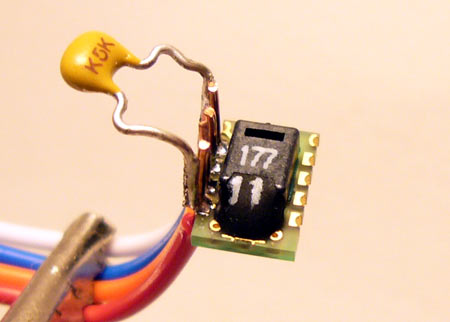
Sensirion’s SHTxx is a digitally interfaced humidity and temperature sensor. Accurate humidity measurements usually require careful analog design, but the SHTxx moves all that complicated stuff into a single chip. Through-hole (SHT7x) and surface mount (SHT1x) versions are available, we used the surface mount SHT11 with +/-3% accuracy. We’ll show you how to use the SHTxx below.
Sensirion SHT1x/SHT7x precision humidity and temperature sensor (Octopart search, starting at $25).
This isn’t a cheap sensor. Octopart lists a few places to buy it. Several smaller hobby electronics stores carry it; Hobby Engineering has it for $29 (#H01509-01C). We found compatible PCB footprints in sht10_11_15.lbr and sht11.lbr on the Cadsoft library download page. Pin connections for the different package types are in the datasheet: SHT1x (PDF), SHT7x (PDF).

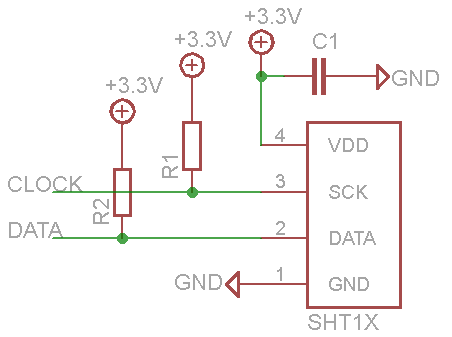
The SHTxx has a two-wire serial interface that requires pull-up resistors (R1,2), values between 2K and 10K should work. Sensirion recommends a decoupling capacitor (C1) only if the sensor is powered over a length of wire, but we think it’s always a good idea to include one.
We’ll demonstrate the SHTxx using the Bus Pirate universal serial interface in raw2wire mode with Hi-Z outputs. The SHTxx is powered from the Bus Pirate’s 3.3volt supply. The Bus Pirate’s on-board pull-up resistors hold the bus high, eliminating the need for external resistors R1 and R2.
Interface
The SHTxx communicates over two wires using a simple serial protocol. The protocol isn’t compatible with I2C, but a single SHTxx can exist on a bus with I2C peripherals.
| Command | Code |
| Measure Temperature | 00000011 |
| Measure Relative Humidity | 00000101 |
| Read Status Register | 00000111 |
| Write Status Register | 00000110 |
| Soft reset | 00011110 |
Five commands control the SHTxx, these are outlined in the table. The first 3 bits are the address (always 000), the remaining 5 bits are a unique command code.
Reset
Start a transaction by clearing any partial commands or data from a previous use. A minimum of nine clock ticks while data is high will clear the SHTxx interface. The Bus Pirate syntax to for this is -^:9; data high (-), 9 clock ticks (^:9).
Commands to the SHT11 begin with a unique start condition. Like an I2C start condition, this is the only time when the data signal changes with the clock signal high. This illegal condition causes the chip to prepare for a new command. The SHTxx start condition is different than I2C, allowing both types of devices to exist on the same bus.
The Bus Pirate code to generate an SHTxx style start condition is -/_\/-\ ; data starts high (-), clock up (/), data goes low (_), clock low (\), clock high (/), data goes high (-), and a final clock low transition (\) ends the sequence.
A soft reset is a good idea because it puts the chip in a default state. Prior to the first temperature or humidity conversion, we send the soft reset command.
RAW2WIRE>-^:9 -/_\/-\ 0b00011110 !<–command
4xx RAW2WIRE DATA OUTPUT, 1 <–clear interface
4xx RAW2WIRE 0×09 CLOCK TICKS
4xx RAW2WIRE DATA OUTPUT, 1 <–start condition
4xx RAW2WIRE CLOCK, 1
4xx RAW2WIRE DATA OUTPUT, 0
4xx RAW2WIRE CLOCK, 0
4xx RAW2WIRE CLOCK, 1
4xx RAW2WIRE DATA OUTPUT, 1
4xx RAW2WIRE CLOCK, 0
420 RAW2WIRE WRITE: 0×1E <–soft reset code
4xx RAW2WIRE READ BIT: 0 <–acknowledge bit, OK
RAW2WIRE>
First, we clear the interface (-^:9), then send the start condition (-/_\/-\). The reset command (0b00011110=0×1E) follows. The SHTxx acknowledges (acks) commands by pulling the data line low for one bit after a command is transmitted. We read one bit (!) to get the acknowledgment status; 0 is success, 1 signals an error.
Temperature
Now we can read the temperature. This happens in two steps, with a delay for the temperature conversion.
RAW2WIRE>-^:9 -/_\/-\ 0b00000011 !
4xx RAW2WIRE DATA OUTPUT, 1 <–clear interface
4xx RAW2WIRE 0×09 CLOCK TICKS
4xx RAW2WIRE DATA OUTPUT, 1 <–start condition
…
4xx RAW2WIRE CLOCK, 0
420 RAW2WIRE WRITE: 0×03 <–start temperature conversion
4xx RAW2WIRE READ BIT: 0 <–ack bit, OK
RAW2WIRE>
First, we send a start condition and the temperature conversion command (00000011=0×03). The SHTxx replies to a successful command by pulling the data line low for one bit (ack). After the ack bit, the data line goes high until the conversion finishes.
RAW2WIRE>.
4xx RAW2WIRE DATA INPUT, STATE: 0 <–data low when done
RAW2WIRE>
When the data line goes low, the temperature conversion is finished. ‘.’ is the Bus Pirate command to read the data state without a clock tick. Now we can grab the result.
RAW2WIRE>r_^ r_^ r_^
430 RAW2WIRE READ: 0×17 <–data byte 1
4xx RAW2WIRE DATA OUTPUT, 0 <–data low
4xx RAW2WIRE 0×01 CLOCK TICKS <–send ack bit
430 RAW2WIRE READ: 0xCC <–data byte 2
4xx RAW2WIRE DATA OUTPUT, 0
4xx RAW2WIRE 0×01 CLOCK TICKS
430 RAW2WIRE READ: 0×0C <–crc
4xx RAW2WIRE DATA OUTPUT, 0
4xx RAW2WIRE 0×01 CLOCK TICKS
RAW2WIRE>
Each byte read (r) requires an I2C style acknowledgment bit with the data low. We do this with the _^ sequence; data low (_), one clock tick (^).
The first two bytes are the temperature reading (0×17cc), followed by a CRC (0×0c). The raw value (0×17cc=6092) is converted to degrees Celsius using the equation and coefficients on page 9 of the datasheet. Temperature readings are 14bits by default:
T = -39.7 + 0.01*X
21.22C = -39.7 + (0.01*6092)
Humidity
Humidity conversions are started with code 00000101 (0×05 hex).
RAW2WIRE>-^:9 -/_\/-\ 0b00000101 ! <–command
4xx RAW2WIRE DATA OUTPUT, 1 <–clear interface
4xx RAW2WIRE 0×09 CLOCK TICKS
4xx RAW2WIRE DATA OUTPUT, 1 <–start condition
…
4xx RAW2WIRE CLOCK, 0
420 RAW2WIRE WRITE: 0×05 <–start humidity conversion
4xx RAW2WIRE READ BIT: 0<–ack bit, OK
As before, a ninth acknowledgment bit is low if the SHTxx processed the command.
RAW2WIRE>.
4xx RAW2WIRE DATA INPUT, STATE: 0 <–data low when done
The data line goes high and then returns low when the humidity conversion is done.
RAW2WIRE>r_^ r_^ r_^
430 RAW2WIRE READ: 0×05 <–data byte 1
4xx RAW2WIRE DATA OUTPUT, 0 <–data low
4xx RAW2WIRE 0×01 CLOCK TICKS <–ack bit
430 RAW2WIRE READ: 0×80 <–data byte 2
4xx RAW2WIRE DATA OUTPUT, 0
4xx RAW2WIRE 0×01 CLOCK TICKS
430 RAW2WIRE READ: 0×46 <–crc
4xx RAW2WIRE DATA OUTPUT, 0
4xx RAW2WIRE 0×01 CLOCK TICKS
RAW2WIRE>
A complete conversion generates a three byte response. The first two bytes are the raw humidity reading (0×0580=1408), the final byte is a CRC (0×46) that can be used to verify data integrity.
Humidity readings have 12bits of resolution by default, convert to humidity using this equation:
RH = -2.0468 + 0.0367(X) + (-0.0000015955*(X^2))
46.46%RH = -2.0468 + 0.0367(1408) + (-0.0000015955*(1408^2))
Conclusion
This isn’t a cheap sensor, but it doesn’t require careful analog design like the Honeywell HIH series. Have you worked with a humidity sensor?
Like this post? Check out the parts posts you may have missed.

Unique method of home automation

[leevonk] sent us this quick and dirty home automation set up. Using photo resistors and your computer screen, you can drive as many relays or actuators as you want. [leevonk] is simply using changes in brightness on his computer screen to set off relays. This makes it easy for someone who has no programming knowledge and a tight budget to set up some automation. You could even do remote automation by connecting to your pc via VNC. Be careful taping things to your screen, wouldn’t want to damage it.

Passive Multidimensional Input
Any musician who has ever used a computer to create music will tell you that while this technology is more than capable of producing great music, it is always a much more intimate experience to create by physically playing an instrument. In an effort to bridge this gap, [Randall Jones] has built a passive multidimensional interface that uses multitouch input to create an intimate experience that rivals that of a traditional musical instrument. While this concept may seem very complicated, the interface is made of only copper strips, rubber, and wood. At $50, this interface was designed to be inexpensive and appears to be very easy to use. As seen in the video, this interface can be used as anything from a drum to a multitouch synthesizer.
[via Make]

25C3: Hacking the iPhone
As promised in their yellowsnow demo, [pytey], [MuscleNerd], and [planetbeing] from the iphone-dev team presented at 25C3 on their work Hacking the iPhone. The team originally formed in 2007 and this is the most comprehensive presentation on how the iPhone was compromised to date. You can find the full talk embedded above.
They opened with a few stats about how popular their software is. Our favorite by far is that at least 180 people with Apple corporate IPs update their phones using the dev-team’s software on a regular basis. From there the talk was split into two sections: jailbreaking the S5L application processor and unlocking the S-Gold baseband processor.
The phone relies on a chain of trust to guarantee that only Apple’s code is being run on it. All of userland is signature checked by the kernel. The kernel is checked when loaded by iboot. The iboot image is checked when loaded by LLB. LLB is loaded from the NOR by the lowest piece of code, the bootrom. That’s where things fall apart; the bootrom does not check the signature of the LLB. To take advantage of this, the team found what they describe as a classic stack buffer overflow in DFU mode. DFU is Device Firmware Upgrade mode, a state that the phone can be forced into after the bootrom loads. Their exploit forces the certificate check to return ‘true’. They are then able to patch all of the subsequent signature checks out of the phone’s system.
The baseband processor proved to be much more difficult simply because it doesn’t have any sort of recovery mode; bricking a phone was always a possibility. The S-Gold is a complete system-on-chip and has a unique ID on each phone. The NOR also has a unique ID on each phone. These two IDs are used to sign the secpack, which in turn enforces the SIM carrier lock. These unique IDs are why you can’t just take an officially unlocked phone and copy the secpack off of it to unlock another phone. Everything else is identical: the firmware, the baseband, the bootroom are all the same. On the second generation iPhone, the bootrom checks the bootloader. The bootloader then verifies the bootrom before checking and then loading the firmware. The firmware enforces the carrier lock. The team decided that it wasn’t worth attempting to break the chain of trust. The SIM unlock code they developed is divided into two sections. The first part is the actual software unlock. They patch the firmware while it’s running in RAM. Their patch modifies the firmware’s decision tree about whether to enforce the carrier lock. The second half is the exploit that allows them to inject the code. The team knows that Apple can and probably will patch the exploit hole, but their RAM patching code will always work, so it’s just a matter of finding another hole to apply it through. In order to do a permanent unlock solution (like on the first generation iPhone), they’d need to analyze the actual bootrom code.
The team mentioned several things Apple did that actually helped them in their efforts. Security was gradually rolled out, so they were able to look at things that would eventually be hidden. The firmware was initially unencrypted. Earlier versions trusted iTunes, something they could easily modify. All userland apps originally ran as root meaning any application exploit gave root level access.
The iphone-dev team has truly put in a tremendous amount of effort and we look forward to the yellowsn0w release on New Year’s Eve.

You received this email because you are subscribed to the real_time feed for http://hackaday.com/feed/. To change your subscription settings, please log into RSSFWD.
No comments:
Post a Comment