Surviving a hacker conference

With another hacker conference looming in front of us, it’s time to start thinking about hardware security. Hacker conventions have the most hostile network you’ll ever encounter. [Security4all] points out that 25C3 already has an extensive page on securing your hardware. It starts from the ground up with physical security, BIOS passwords, and locking down bootloaders. There’s a section on securing your actual OS and session. Finally, they cover network usage. It mentions using SSH for dynamic forwarding, which we feel is a skill everyone should have. We’ve used it not just for security, but for bypassing brainless bandwidth restrictions too. There’s also the more trick transparent version. Every piece of data you bring with you, you risk losing, so they actually recommend just wiping your iPhone and other devices before attending. It’s important to remember that it’s not just your own data at risk, but everyone/thing you communicate with as well.

How to properly dispose of fruitcake
While doing serious fruitcake research, (no, really) we stumbled across the Great Fruitcake Toss held every January in Colorado. The particular entry above caught our eye. Omega 380 was built by a group of Boeing engineers and currently holds the distance record of 1,420feet. It’s a large compressed air cannon. All pressure is human generated using an exercise bike turning a pump. Apparently the team’s first contest entry was a classic surgical tubing slingshot. It eventually broke down during a very cold year, so they switched to this newer design. You can see more videos on the Operation Fruitcake blog.

NYC CCTV scouting

On a recent trip to New York City, [sherri] noticed the abundant “NYPD Security Camera” signage. She Ò on her little sousveillance tour and did some digging to learn more about the system. According to a recent NY Post article, the city intends to have 2,000 cameras installed by 2009. Each unit has at least two cameras, an onboard DVR, battery backup, a webserver, and wireless connection. The CrimeEye product line is manufactured by Total Recall—the people who brought you BABYWATCH. While the company site doesn’t list any specs, we found a price list that was provided to New York State. Each unit lists for $28-39K. They can have image sensors up to 2 megapixels, hold 30fps video for 5-15days, and transmit wirelessly on the 4.9GHz public safety band.
[sherri] wonders what systems are in place to guarantee the security of the camera network and to make sure the data is handled properly. We’ve seen bad implementations of cameras with webservers
in the past. She suggests a third-party system to verify security, operation, and storage. Right now there’s no reason the government won’t use footage for invasive data mining. As a publicly funded system monitoring public areas, we see no reason why the video streams from these devices shouldn’t be widely available.
[Thanks Tendency]

Working with VFDs
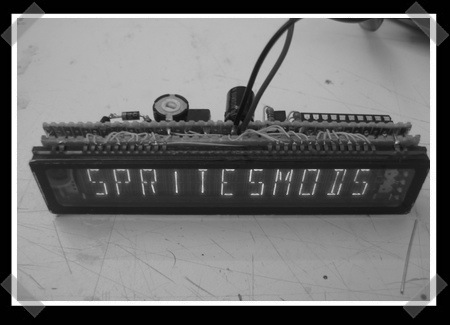
We love old display technology, like Nixie tubes, but they’re often difficult to work with because they require higher voltages than digital logic. Vacuum florescent displays (VFD) fall into this category. While not necessarily “old”, they are becoming far less common than LCDs. The main benefit of a VFD is that it actually produces light directly; it doesn’t require a backlight. You’ll find these displays on various players and appliances: CD, DVD, VCR, microwaves, stoves, car headunits, and others.
[Sprite_tm] had written off some VFDs, but recently revisited them with renewed interest. He started by testing what sort of voltage would be required to drive the display. It took 3V for the filament plus 15V to drive the grids. There are VFD controller chips available, but he wanted to get this working with what he had on hand. He had experience with older 40xx series logic, which can be powered by much higher voltages than 5V 74xx. His final schematic has three 4094 serial to parallel chips with an ATtiny2313 controller. A 5V power supply is dropped to 3V with diodes to drive the filament while a boost converter brings it up to 15V for the 4094s that switch the segments. While the code is specific to this display, it would be a great place to start your own project.

RepRap Motherboard
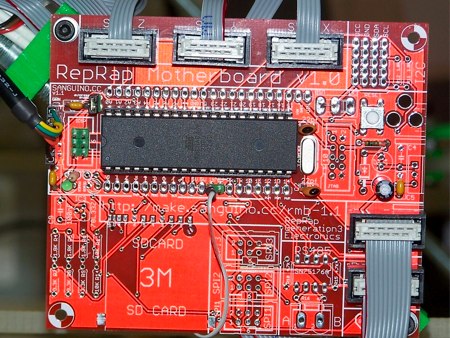
When the RepRap team found themselves pushing the limits of the Arduino, they started looking for alternatives. They found it in the ATMega644P. It has four times the memory and four times the RAM compared to the ATMega168 used in the standard Arduino. It also has 32 I/O pins. They ported the Arduino software to the microcontroller and started producing Sanguino boards. Now that the base design is nailed down, they’ve begun expanding it to their specific purpose. Pictured above is a prototype RepRap motherboard. While the Sanguino is barebones, this board has onboard connectors for all of the RepRap’s motors, so you can just plug it in. It is also designed to support the future Generation 3 electronics. Probably the most interesting feature is the SD card slot. The goal is to eventually have a board that can run the RepRap without a host computer if necessary; it will manufacture designs directly from the flash card.

Pelican case Xbox 360
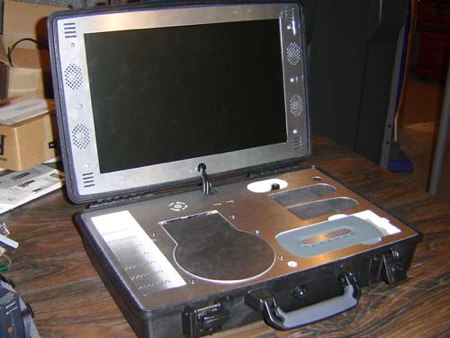
[Ben Heck] has put the final touches on his Pelican case Xbox 360. This prototype was constructed for use by troops stationed overseas. When he announced the project in October, he already knew some of the hurdles he would face. An industrial Velcro style product is used for all component mounting so the air/water-tight seal of the case remains intact. He sanded the surface so that it would stick better. [Ben] mentions that he ended up using less Velcro than he planned on because it held so well. Not being able to cut the case meant the DVD drive had to be converted to top-loading. The tray movement limit switches have been relocated so they now respond to lid position. He regrets not being able to motorize the lid, but let it go since this is still just the first attempt. Extra copper was added to all of the heat sinks to improve cooling. This Xbox is for sale and he’d love to hear from anyone that wants to put it into production. The write-up has a ton of pictures and you can see a video of it below.

Giant LED lamp
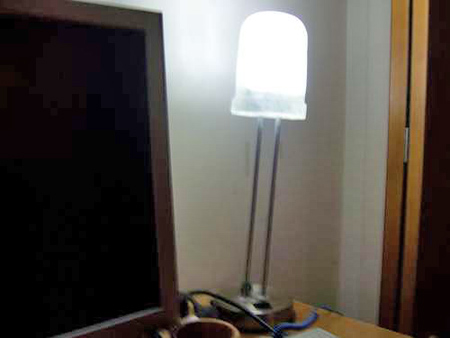
[guyfrom7up] must really really love LEDs. When he needed some lighting, which would obviously be LED powered, he chose to actually build a giant LED. Well, he didn’t actually build a giant functional LED, but rather an LED shaped diffuser for some high powered LEDs. He takes us through the process of first creating a wooden model, using that to create a mold, then forming the final diffuser. The final product is very well done, and instantly identifiable by any geek.
[thanks Brian]

Multitouch MAME cabinet
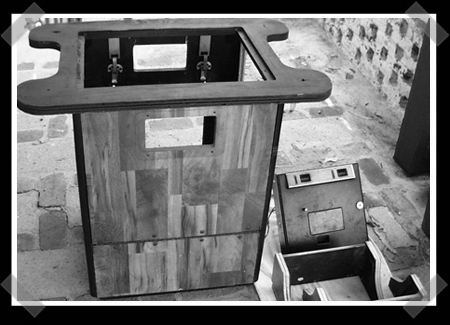
[rdagger] sent us this really well done multitouch MAME cabinet build. He ha penned to find a used, and fairly worn cocktail cabinet. The monitor was damaged, keys lost, and internals had been home to mice for some time. He promptly tore out the old guts, replaced the smelly mouse damaged base and began building the projection system. For touch sensing, he’s using a web cam with the IR filter removed to detect disturbances in some IR laser beams. We’re not completely clear on how he mounted the lasers, he skips over that part. There’s nothing groundbreaking in the technology here, we’ve done multitouch many times before. This project stands out in its execution. [rdagger] has done a fantastic job, the construction looks fantastic. Check out a video of it working after the break.

Parts: 1K 1-Wire EEPROM (DS2431)
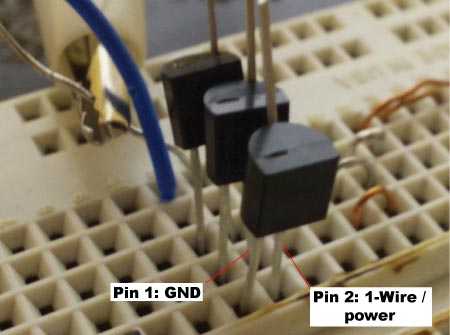
The Maxim DS2431 1K EEPROM is 1-Wire device that adds storage to a project using a single microcontroller pin. We previously interfaced a 1-wire thermometer, but this EEPROM is slightly different because it draws power directly from the 1-Wire bus. Grab the datasheet (PDF) and follow along while we read and write this simple 1-Wire memory.
DS2431 1-Wire 1K EEPROM (Digikey #DS2431+-ND, $1.67)
We used our Bus Pirate universal serial interface to demonstrate the DS2431 EEPROM, we covered the proper connections and configuration options in our previous 1-wire post. The DS2431 requires just two connections: ground (pin 1) and 1-Wire/power (pin 2). Pin 3 remains unconnected. Like last time, we used a 2K pull-up resistor with the 1-Wire bus.
First, we use the Bus Pirate’s SEARCH ROM command to identify connected 1-Wire devices.
1-WIRE>(240) <–SEARCH ROM command macro
xxx 1WIRE ROM COMMAND: SEARCH (0xF0)
Found devices at:
Macro 1-WIRE address
1.0×2D 0×54 0xD2 0xEF 0×00 0×00 0×00 0×2B <–address
*DS2431 1K EEPROM <– type
2.0×2D 0xFE 0×8D 0×43 0×01 0×00 0×00 0×52
*DS2431 1K EEPROM
3.0×2D 0×2B 0xED 0xEF 0×00 0×00 0×00 0×7C
*DS2431 1K EEPROM
Found 0×03 devices.
The first 10 device IDs are available by MACRO, see (0).
1-WIRE>
The SEARCH ROM command reveals that there are 3 EEPROMs connected to the 1-Wire bus. The Bus Pirate stores the 64bit 1-wire addresses in macros so we don’t have to type it every time. We’ll work with the first device, identified by macro (1).
Writing to the DS2431 takes three steps:
- Write data to DS2431’s 8byte ’scratch pad’ EEPROM buffer
- Verify the scratch pad contents and get the write access key
- Copy data from the scratch pad to the EEPROM for permanent storage.
Command 0×0f writes to the scratch pad. The scratch pad is an 8byte buffer that holds data prior to saving it permanently in the EEPROM.
1-WIRE>(85)(1) 0×0f 0×00 0×00 0 1 2 3 4 5 6 7 <–command
xxx 1WIRE BUS RESET OK
xxx 1WIRE WRITE ROM COMMAND: MATCH (0×55) *follow with 64bit address
xxx 1WIRE ADDRESS MACRO 1: 0×2D 0×54 0xD2 0xEF 0×00 0×00 0×00 0×2B
xxx 1WIRE WRITE: 0×0F <–write to scratch pad
xxx 1WIRE WRITE: 0×00 <–begin address byte 1
xxx 1WIRE WRITE: 0×00 <–begin address byte 2
xxx 1WIRE WRITE: 0×00 <–data
xxx 1WIRE WRITE: 0×01
xxx 1WIRE WRITE: 0×02
xxx 1WIRE WRITE: 0×03
xxx 1WIRE WRITE: 0×04
xxx 1WIRE WRITE: 0×05
xxx 1WIRE WRITE: 0×06
xxx 1WIRE WRITE: 0×07
1-WIRE>
The MATCH ROM macro, (85), isolates the the first device, (1). 0×0f is the command to write to the scratch pad, followed by the start address, 0 0. Finally, we send eight bytes of data to save in the scratch pad. The scratch pad is eight bytes long, and all eight bytes will be copied from the scratch pad to the EEPROM at once.
1-WIRE>(85)(1) 0xaa r:3 r:8 r:2 r:2 <–command
xxx 1WIRE BUS RESET OK
xxx 1WIRE WRITE ROM COMMAND: MATCH (0×55) *follow with 64bit address
xxx 1WIRE ADDRESS MACRO 1: 0×2D 0×54 0xD2 0xEF 0×00 0×00 0×00 0×2B
xxx 1WIRE WRITE: 0xAA <–read scratch pad
xxx 1WIRE BULK READ, 0×03 BYTES: <–access code
0×00 0×00 0×07
xxx 1WIRE BULK READ, 0×08 BYTES:<–verify our data
0×00 0×01 0×02 0×03 0×04 0×05 0×06 0×07
xxx 1WIRE BULK READ, 0×02 BYTES:<–inverse CRC
0×44 0×67
xxx 1WIRE BULK READ, 0×02 BYTES:<–all 1s from here
0xFF 0xFF
1-WIRE>
To copy data from the scratch pad to the EEPROM, we must first retrieve a three byte access code from the scratch pad with the command 0xaa. The first three bytes are the access code (0×00 0×00 0×07), followed by the data contained in the scratch pad.
1-WIRE>(85)(1) 0×55 0×00 0×00 0×07
xxx 1WIRE BUS RESET OK
xxx 1WIRE WRITE ROM COMMAND: MATCH (0×55) *follow with 64bit address
xxx 1WIRE ADDRESS MACRO 1: 0×2D 0×54 0xD2 0xEF 0×00 0×00 0×00 0×2B
xxx 1WIRE WRITE: 0×55 <–copy to EEPROM command
xxx 1WIRE WRITE: 0×00<–access code (3 bytes)
xxx 1WIRE WRITE: 0×00
xxx 1WIRE WRITE: 0×07
1-WIRE>!!!! <–read bits
xxx 1WIRE READ BIT: 0
xxx 1WIRE READ BIT: 1 <–bits alternate, done
xxx 1WIRE READ BIT: 0
xxx 1WIRE READ BIT: 1
1-WIRE>
Command 0×55 with the correct access code will copy the scratch pad to the data EEPROM. Bit reads (!!!!) alternate between 0 and 1 when the copy completes.
1-WIRE>(85)(1) 0xf0 0×00 0×00 r:8 r:8
xxx 1WIRE BUS RESET OK
xxx 1WIRE WRITE ROM COMMAND: MATCH (0×55) *follow with 64bit address
xxx 1WIRE ADDRESS MACRO 1: 0×2D 0×54 0xD2 0xEF 0×00 0×00 0×00 0×2B
xxx 1WIRE WRITE: 0xF0 <–read memory
xxx 1WIRE WRITE: 0×00 <–start address (2 bytes)
xxx 1WIRE WRITE: 0×00
xxx 1WIRE BULK READ, 0×08 BYTES: <–read back data
0×00 0×01 0×02 0×03 0×04 0×05 0×06 0×07
xxx 1WIRE BULK READ, 0×08 BYTES: <–read beyond our data
0×00 0×00 0×00 0×00 0×00 0×00 0×00 0×00
1-WIRE>
Command 0xf0 followed by a two byte memory address (0×00 0×00) begins the data read process. The first eight bytes (r:8) are the values we wrote earlier. Reads don’t involve the scratch pad and don’t have an 8byte limit, so further reads continue to the end of the memory.
Don’t forget to catch up on any parts posts you may have missed.

You received this email because you are subscribed to the real_time feed for http://hackaday.com/feed/. To change your subscription settings, please log into RSSFWD.


No comments:
Post a Comment